
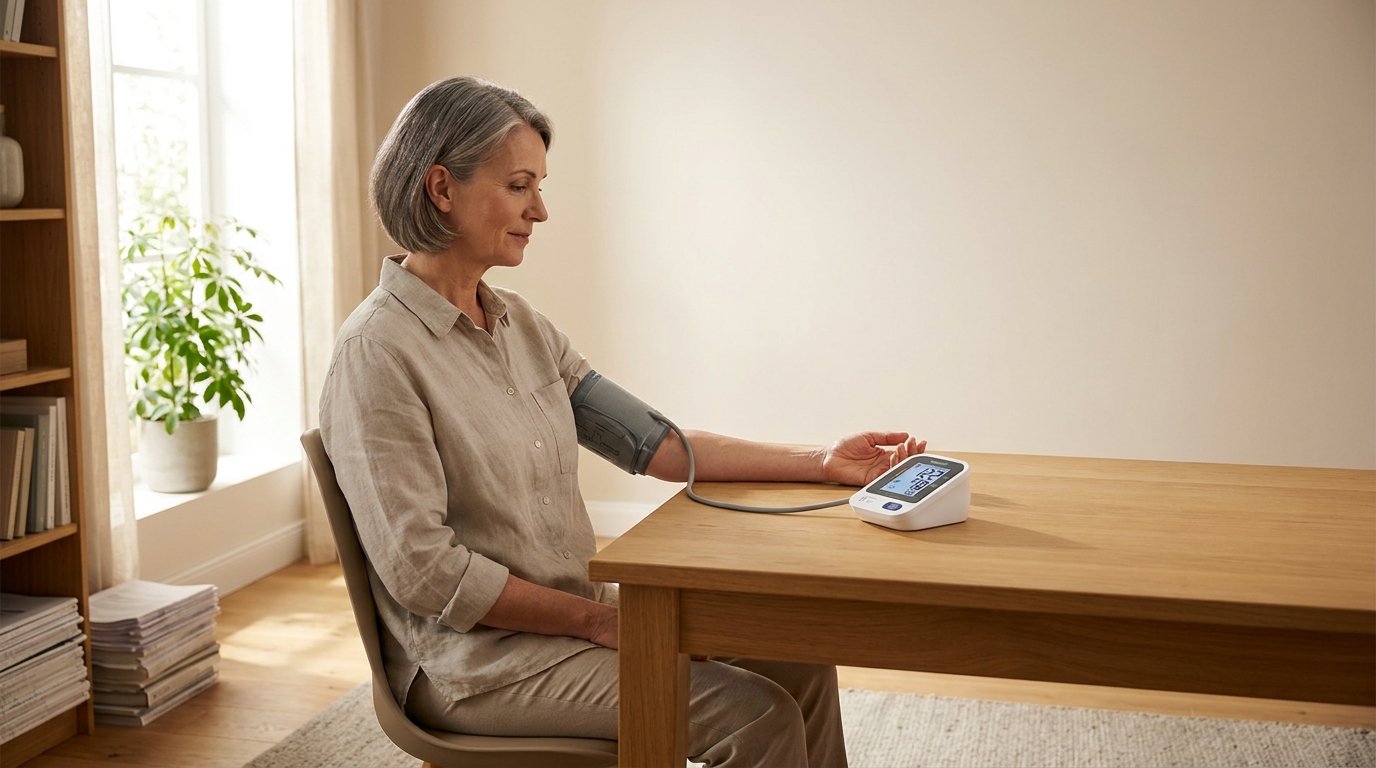
Checking your blood pressure at home is one of the simplest and most useful things you can do for your long-term health. Blood pressure often has no symptoms, so many people live with high readings for years without knowing it. Home monitoring lets you spot problems early, track how well your treatment is working, and give your doctor a much clearer picture than a single reading taken in a clinic. This guide explains everything you need to know, from choosing a device to interpreting your results.
Why Measuring Blood Pressure at Home Is Worth Doing
Blood pressure changes throughout the day. It rises when you are stressed, active, or in pain, and it falls when you rest or sleep. A single reading at the doctor’s office can be misleading because some people feel nervous in a medical setting, which raises their numbers, a pattern known as “white coat hypertension.” Others have normal readings in the clinic but high readings at home, which is called “masked hypertension.” Regular home readings taken in a calm, familiar place help reveal your true everyday pattern.
Home monitoring is especially helpful if you have been diagnosed with high blood pressure, if you are adjusting medication, if you have diabetes or kidney disease, if you are pregnant and your doctor has advised monitoring, or if high blood pressure runs in your family. It also helps healthy adults who simply want to keep an eye on their heart health as they get older.
Choose the Right Blood Pressure Monitor
The device you use matters as much as the technique. For most people, the best choice is an automatic upper-arm monitor with an inflatable cuff. These devices are easy to use, do not require a stethoscope, and are generally more reliable than other types for home use.
Wrist monitors are smaller and more convenient, but they are more sensitive to arm and wrist position, so errors are more common. Finger monitors and smartwatch readings are not recommended as your main way of tracking blood pressure. If you have a wrist device already, it can still be useful, but you should follow the instructions very carefully and compare it against a doctor’s reading.
Look for a monitor that has been clinically validated, which means it has been independently tested and shown to give accurate results. Many health organizations and hypertension societies maintain lists of validated devices, and reputable manufacturers usually state on the packaging whether the model has passed validation. A simple display, a memory function, and a cuff that fits your arm are more important than extra features.
Get the Right Cuff Size
A cuff that is too small can give falsely high readings, while one that is too large can give falsely low readings. To find your size, measure around the middle of your bare upper arm, halfway between your shoulder and elbow. As a rough guide, a small adult cuff fits arms of about 22 to 26 centimeters (9 to 10 inches), a standard adult cuff fits about 27 to 34 centimeters (10.5 to 13 inches), a large adult cuff fits about 35 to 44 centimeters (14 to 17 inches), and an extra-large cuff fits about 45 to 52 centimeters (18 to 20 inches). Exact ranges vary by brand, so always check the size chart that comes with your monitor. Many devices include a marking on the cuff that shows whether it fits properly.
How to Prepare Before You Measure
Good preparation removes many of the common causes of inaccurate readings. Avoid caffeine, exercise, and smoking for at least 30 minutes before you measure, because all three can temporarily raise your blood pressure. Use the bathroom first, since a full bladder can push your numbers up slightly. Wear a short-sleeved top or roll up your sleeve so the cuff can go directly on bare skin, and make sure the rolled sleeve is not squeezing your arm.
Then sit quietly for five minutes before you begin. During this time, try to relax, breathe normally, and avoid looking at your phone, watching something stressful, or talking to other people. Choose a quiet place with a comfortable temperature, because cold can make blood vessels tighten and raise your reading.
Step-by-Step: How to Measure Blood Pressure at Home
Follow these steps each time so your readings are consistent and comparable.
- Sit correctly. Sit in a chair with your back supported, your feet flat on the floor, and your legs uncrossed. Crossing your legs can raise your reading by several points.
- Position your arm. Rest your arm on a table or armrest so that the middle of the cuff is at the same level as your heart. If your arm hangs down or is held up in the air, the reading will be inaccurate.
- Place the cuff. Wrap the cuff around your bare upper arm with the lower edge about 2 to 3 centimeters (roughly one inch) above the bend of your elbow. Line up the artery marker on the cuff with the inner side of your arm. The cuff should be snug, with room for about one finger underneath.
- Stay still and quiet. Press the start button, then keep your body relaxed and avoid talking or moving while the cuff inflates and deflates.
- Record the result. When the reading appears, write down both numbers, the date, the time, and your pulse if the monitor shows it. The top number is your systolic pressure, which is the force when your heart beats, and the bottom number is your diastolic pressure, which is the force when your heart rests between beats.
- Repeat the measurement. Wait one minute and take a second reading. Record it as well, and if the two readings differ by a large amount, take a third.
When and How Often to Measure
Timing and consistency give you the most useful information. A commonly recommended routine is to measure twice in the morning, before taking any blood pressure medication and before breakfast, and twice in the evening, before dinner, with about one minute between readings. Doing this for seven days in a row gives your doctor a solid average. Many guidelines suggest discarding the first day’s readings, because people tend to be more tense when they are new to the routine, and averaging the rest.
If you have already been diagnosed and your condition is stable, your doctor may recommend checking less often, such as a few times a week. Follow the plan that your healthcare provider gives you rather than testing constantly, because checking many times a day can create unnecessary anxiety and does not improve accuracy.
What Your Blood Pressure Numbers Mean
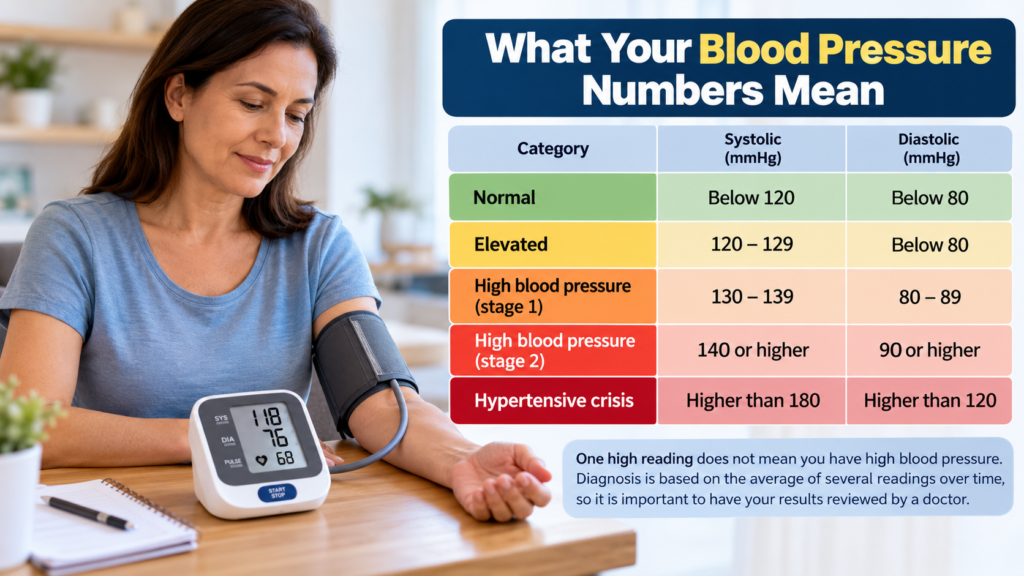
Blood pressure is measured in millimeters of mercury, written as mmHg. The American Heart Association groups adult readings into the following categories.
- Normal: below 120 systolic and below 80 diastolic
- Elevated: 120 to 129 systolic and below 80 diastolic
- High blood pressure, stage 1: 130 to 139 systolic or 80 to 89 diastolic
- High blood pressure, stage 2: 140 or higher systolic or 90 or higher diastolic
- Hypertensive crisis: higher than 180 systolic and/or higher than 120 diastolic
Home readings are often slightly lower than clinic readings, and different guidelines use slightly different cut-offs for home monitoring. Many European and international guidelines treat an average home reading of 135/85 mmHg or above as high, while American guidelines use 130/80 mmHg as the point where stage 1 hypertension begins. One high reading does not mean you have high blood pressure. Diagnosis is based on the average of several readings taken over time, which is why a doctor’s review is essential. Your personal target may also be different from the general categories depending on your age and health conditions.
When to Get Medical Help Immediately
If a reading is higher than 180/120 mmHg, sit quietly for five minutes and measure again. If it is still that high and you have symptoms such as chest pain, shortness of breath, back pain, numbness or weakness, vision changes, confusion, or difficulty speaking, call emergency services right away. If the reading is that high but you feel fine, contact your doctor without delay for advice.
Low blood pressure can also matter. A reading below 90/60 mmHg is not always a problem, but if it comes with dizziness, fainting, blurred vision, or unusual tiredness, you should speak to a healthcare professional.
Common Mistakes That Give False Readings
The most frequent errors are using a cuff of the wrong size, measuring over clothing, sitting with crossed legs, talking during the reading, letting the arm hang unsupported, and measuring right after coffee, exercise, or a stressful moment. Using a device that has not been validated, or one that is very old, can also lead to unreliable numbers. Taking only one reading instead of two, or measuring at a different time each day, makes your results harder to interpret.
It is also worth having your home monitor checked against your doctor’s equipment at least once. Bring the device to an appointment and compare readings taken at the same time on the same arm. During your first checks, measure both arms, and if there is a consistent difference between them, use the arm that gives the higher reading and tell your doctor about the difference.
Can You Measure Blood Pressure Manually?
Yes, although it takes practice. A manual measurement uses a cuff, a squeeze bulb, a gauge, and a stethoscope. You place the cuff on the arm, put the stethoscope over the artery at the inner elbow, inflate the cuff until the pulse sound disappears, and then slowly release the air at about 2 to 3 mmHg per second. The first tapping sound you hear is the systolic pressure, and the point where the sounds fade away is the diastolic pressure. Because this method depends on good hearing and a steady technique, most people are better served by an automatic monitor.
Tips for Keeping a Useful Blood Pressure Log
Write down every reading with its date and time, along with notes about anything unusual, such as poor sleep, stress, illness, or a missed medication. You can use a notebook, a printable chart, or a health app, and many monitors store readings in their memory. Bring your log to every medical appointment, since it helps your doctor decide whether your treatment plan needs to change.
Frequently Asked Questions
Which arm should I use to measure blood pressure? Use the same arm each time. If you are unsure, ask your doctor to compare both arms and use the one with the higher reading.
Is it normal for blood pressure to vary between readings? Yes. Small differences of a few points are normal because blood pressure changes with every heartbeat and breath, which is why taking two readings and averaging them works better than relying on one.
Are wrist blood pressure monitors accurate? They can be, but only if the wrist is held at heart level and the device has been validated. Upper-arm monitors are generally preferred because they are less affected by position.
Can I measure blood pressure lying down? Sitting is the standard position for home readings. Your doctor may sometimes ask for lying or standing measurements, but you should only do this if you are instructed to.
Can an irregular heartbeat affect my reading? Yes. Conditions such as atrial fibrillation can make some automatic monitors less accurate. If you have an irregular heartbeat, ask your doctor which type of device is best for you.
Final Thoughts
Measuring blood pressure at home is simple once you build a routine: choose a validated upper-arm monitor, use the right cuff size, rest for five minutes, sit with good posture, take two readings, and record everything. Doing this consistently gives you and your doctor reliable information that can guide decisions about your health. Remember that the numbers are a tool for conversation with your healthcare provider, not a reason to panic or to change medication on your own.
Disclaimer: This article is for general educational purposes only and does not replace professional medical advice, diagnosis, or treatment. Blood pressure targets and treatment plans differ from person to person. Always talk to a qualified healthcare provider about your readings, and never start, stop, or change medication without their guidance. If you experience severe symptoms or a very high reading, seek emergency medical care immediately.